As businesses grow, integrating robust CRM systems like Salesforce with dynamic content management platforms such as WordPress becomes crucial. This integration not only streamlines operations but also significantly enhances user experiences and data accessibility. In today’s digital age, effective data management and seamless customer interactions are not just advantageous—they are essential. One effective way to achieve this seamless integration is through the MiniOrange Single Sign-On (SSO) plugin.
Why Integrate Salesforce with WordPress?
Integrating Salesforce with WordPress allows your sales, marketing, and content teams to have a unified view of customer interactions and data. This integration can help in personalizing content, capturing leads directly into Salesforce, and providing consistent user experiences across all touchpoints.
What is MiniOrange SSO?
MiniOrange SSO is a plugin that facilitates secure and efficient single sign-on capabilities for WordPress sites. It supports various identity protocols, including SAML, OAuth, and OpenID Connect, making it versatile for connecting with systems like Salesforce.
How to Set Up MiniOrange SSO for Salesforce and WordPress Integration
1. Install the MiniOrange SSO Plugin
First, install the MiniOrange SSO plugin on your WordPress site by navigating to the Plugins section, searching for MiniOrange SSO, and clicking ‘Install Now’. Once installed, activate the plugin.
2. Configure Salesforce as an Identity Provider
In Salesforce, set up an identity provider by navigating to ‘Setup’ > ‘Identity’ > ‘Identity Provider’. Follow the instructions to create a new SAML identity provider. You’ll need to download the metadata file which will be used later in the MiniOrange plugin.
3. Configuring MiniOrange SSO Plugin for Salesforce Integration in WordPress
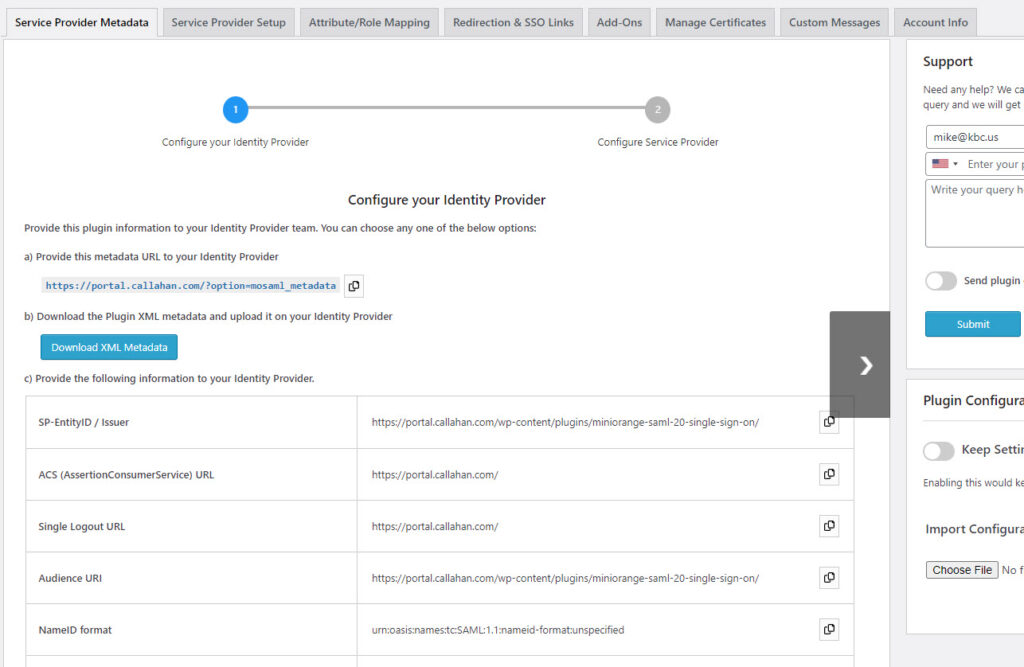
A. Service Provider Metadata Configuration
Metadata URL: Provide this URL to your Identity Provider so they can automatically fetch the necessary configuration details.
Download XML Metadata: Click this button to download your service provider’s metadata in XML format. This file can then be uploaded to your Identity Provider to complete the setup.
Manual Configuration Details: In cases where automatic configuration isn’t possible, you’ll need to manually copy and paste information from WordPress to your Identity Provider (Salesforce). Some of that information includes.
- SP-Entity ID / Issuer
- ACS (Assertion Consumer Service) URL
- Single Logout URL
- Audience URI
- NameID Format
These details are crucial for linking your WordPress site with Salesforce, ensuring that the SAML assertions are correctly processed.

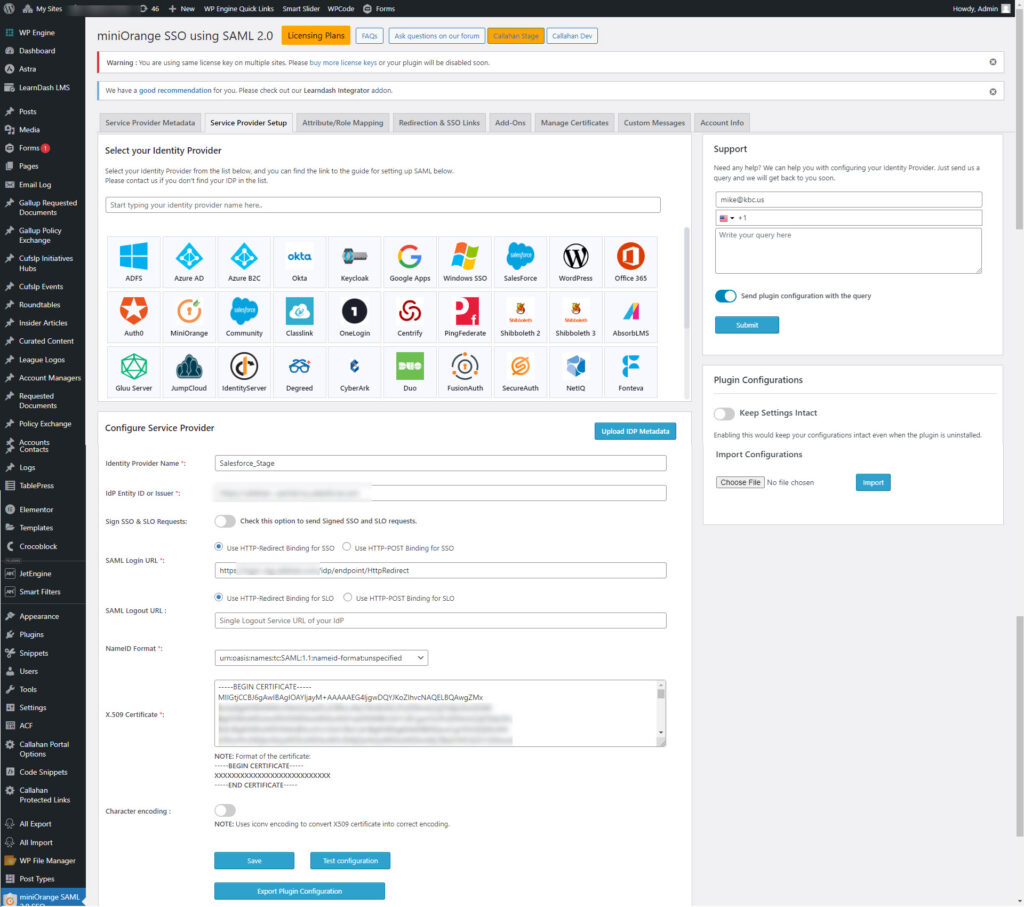
B. Configure Service Provider
Start by choosing from the list of identity providers. In our example we’ll choose Salesforce.
Identity Provider Name: Input a name that identifies this particular Identity Provider setup, useful for administrative purposes.
Entity ID / Issuer: This is the unique identifier for your Identity Provider, which must match the one in Salesforce.
SAML NameID Format: Choose the appropriate NameID format as agreed upon with your Identity Provider.
X.509 Certificate: Paste the X.509 certificate provided by your Identity Provider. This certificate is used to digitally sign your SAML requests and responses, ensuring their authenticity.
SSO & SLO Settings: Configure the Single Sign-On URL and Single Logout URL to manage login and logout requests. Select the appropriate bindings for these URLs to specify how requests are sent (e.g., HTTP-Redirect or HTTP-POST).

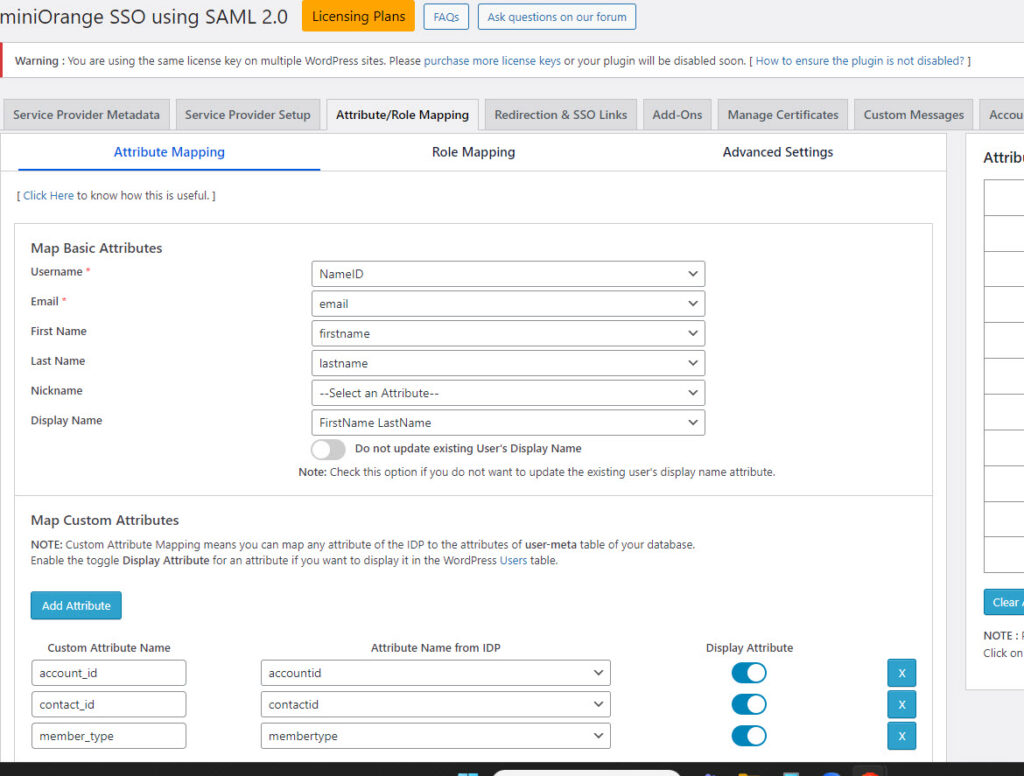
C. Attribute/Role Mapping
Configure how user attributes from Salesforce are mapped to WordPress user attributes:
Basic Attribute Mapping: Map essential user attributes like Username, Email, First Name, and Last Name. These fields are necessary for creating or updating user profiles in WordPress based on Salesforce data.
Custom Attribute Mapping: If there are additional attributes in Salesforce that need to be synced with WordPress, map these in the custom attributes section.

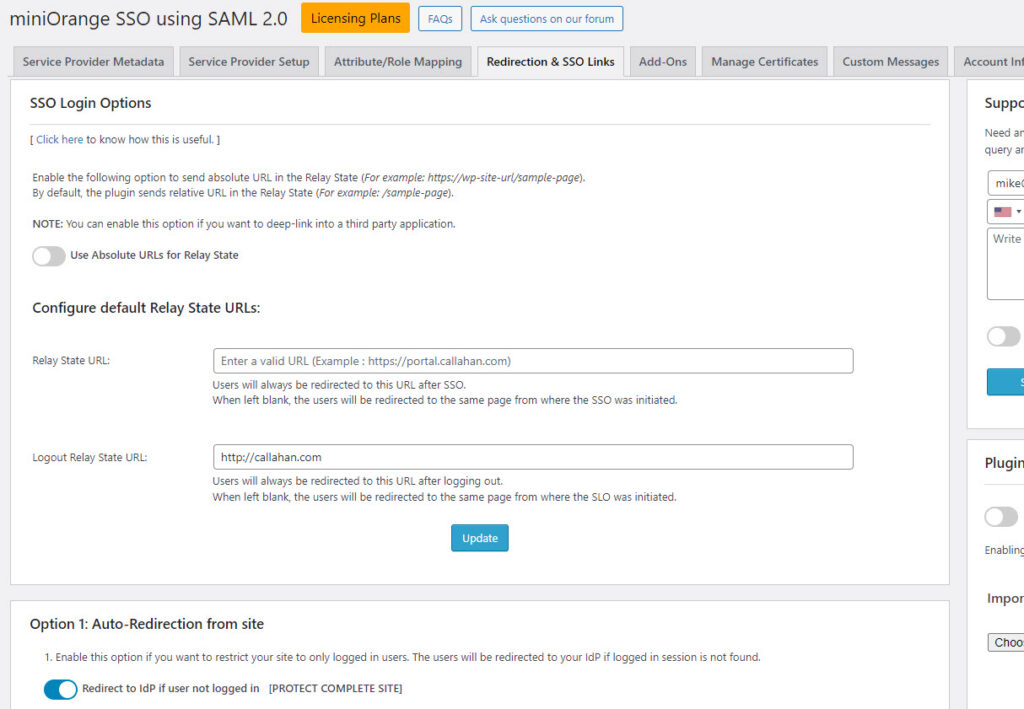
D. Redirection & SSO Links
SSO Login Options: Configure whether to use absolute URLs for the Relay State, which determines where the user is redirected after logging in.
Default Relay State URL: Set a default URL to redirect users after successful login. This ensures a seamless transition back to the site.
Logout Relay State URL: Similarly, configure where users should be redirected after logging out.

This configuration guide provides a step-by-step approach to setting up the MiniOrange SSO plugin with Salesforce as your Identity Provider, facilitating secure and streamlined user management between Salesforce and your WordPress site. This integration not only enhances security by leveraging SSO but also improves user experience by simplifying the login process.
4. Test the Integration
Before going live, conduct thorough testing to ensure that the SSO integration works correctly. Check if the login redirects properly and user data syncs between Salesforce and WordPress without issues.
Use Case Scenario – Create a stunning WordPress customer portal leveraging your Salesforce data
Integrating Salesforce with WordPress using the MiniOrange SSO plugin allows businesses to create a unified customer portal that serves as a one-stop solution for customer interactions and service management. This integration bridges the gap between your CRM data and your customer-facing website, providing a seamless, personalized user experience. Here are specific benefits and implementations of this setup:
Single Sign-On Access
Customers can log into the WordPress portal using a single set of credentials. This SSO capability, powered by MiniOrange, eliminates the need for multiple logins and passwords, reducing friction and enhancing user satisfaction.
Real-Time Data Synchronization
When a customer updates their profile information on the WordPress portal, changes are immediately reflected in Salesforce, and vice versa. This real-time synchronization ensures that the data remains consistent across both platforms, providing accurate and up-to-date information for both customers and your service team.
Personalized Content and Offers
Leverage data stored in Salesforce, such as past purchases, customer preferences, and interaction history, to personalize the content displayed on the WordPress portal. Tailored content can include targeted promotions, personalized product recommendations, and custom content blocks that address individual customer needs and preferences.
Support Ticket Integration
Customers can raise support tickets directly through the WordPress portal, which are then managed in Salesforce. This integration allows support teams to access all customer information and history directly within Salesforce, enabling them to provide faster and more effective responses.
Automated Alerts and Notifications
Set up automated alerts and notifications that are triggered by customer actions on the WordPress site and managed through Salesforce. For example, if a customer requests a callback or subscribes to a newsletter, Salesforce can automatically trigger a workflow that sends an email confirmation or alerts a sales representative.
Reporting and Analytics
With both platforms integrated, generate comprehensive reports and analytics that combine data from Salesforce and WordPress. These insights can help in understanding customer behavior, improving portal features, and measuring the effectiveness of personalized engagements.
By focusing on creating a unified customer portal through the MiniOrange SSO integration, businesses can significantly enhance customer engagement, streamline service management, and improve overall customer satisfaction. This approach not only simplifies the user experience but also provides robust tools for businesses to manage customer interactions efficiently.
Pricing and Cost Considerations
When considering the integration of Salesforce with WordPress using the MiniOrange SSO plugin, it’s important to understand the different pricing options available, as this can influence your choice based on budget and needs.
SAML SP Single Sign-On (SSO)
Price: Starts from $349 per instance.
License Type: Instance-based.
This option allows single sign-on capabilities for one instance of your WordPress site, ideal for businesses that require a straightforward SSO setup without the need for extensive user management.
SAML & WS-FED IDP (SSO using WordPress Users)
Price: Starts from $500 per year for up to 100 users.
License Type: User-based subscription.
This service is suitable for businesses that use WordPress as an identity provider and need to manage access for multiple users across various systems.
OAuth Single Sign-On (SSO) (OAuth client)
Price: Starts from $349 per instance.
License Type: Instance-based.
Similar to the SAML SP option, this service offers OAuth-based single sign-on for a single WordPress instance, focusing on secure access via OAuth standards.
WordPress OAuth Server (OAuth Provider)
Price: Starts from $450 per year for up to 100 users.
License Type: User-based.
This option turns your WordPress site into an OAuth server, allowing it to manage authentication for other applications, suitable for larger organizations or those providing external applications.
WordPress Social Login (Facebook, Google, Twitter)
Price: Starts from $50 per instance.
License Type: Instance-based.
This affordable option integrates social logins into your WordPress site, enhancing user convenience and simplifying the login process.
Expert Integration Services by Keybridge Web
Implementing SSO solutions can be complex, but you don’t have to do it alone. Keybridge Web has extensive experience with integrating CRM and CMS systems, including Salesforce and WordPress. Our team can ensure that your integration is set up smoothly and efficiently, tailored to your specific operational needs. If you’re looking to leverage the benefits of the MiniOrange SSO plugin, reach out to us. For consultation or to get started, you can fill out our contact form or call us directly at 877-302-2185.


